Estimated reading time: 11 minutes
How do I connect a MIDI keyboard to FL Studio? It’s simple and straightforward, but we all know that reading manuals can be a pain. Don’t worry, we’ve got you covered! In this article, we’ll walk you through the process step-by-step and help you unleash your inner musician. Keep reading!
Table of contents
Connecting a MIDI Keyboard to FL Studio
Do you have a MIDI keyboard and want to know how to connect it to FL Studio? Look no further! This guide will show you how to set up your MIDI keyboard and start recording MIDI into FL Studio.
Don’t skip this step: Check your MIDI keyboard manual
First, it’s important to make sure your MIDI keyboard is set up correctly. Check your manual for any necessary drivers or software and make sure they are installed on your computer. Once this is done, it’s time to connect your MIDI keyboard to FL Studio.
Accessing the MIDI Device menu in FL Studio
To manage MIDI keyboard connections from FL Studio, you’ll need to access the MIDI Device menu. First, click on the Options menu in the top toolbar and select MIDI Settings. Go to the Input Settings section and select your MIDI keyboard. Click ‘Enable’ to activate it.
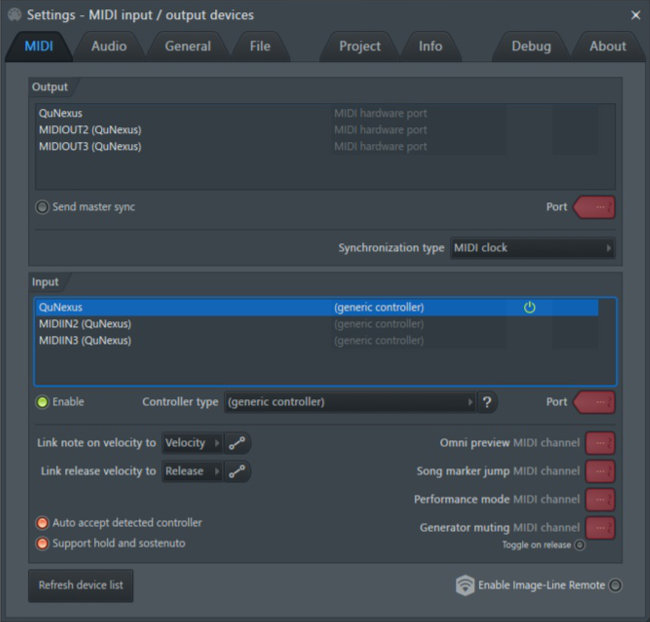
Enabling FL Studio’s USB Audio Device Input
If you see an input labeled “USB Audio Device,” enable it, too, and change the controller type to “Generic Controller. Press a key or pad on your MIDI keyboard to confirm that you’re receiving a MIDI signal.
Recording MIDI from your connected MIDI keyboard in FL Studio
Now that your MIDI keyboard is connected to FL Studio, you can start recording MIDI data. Select a channel in the Step Sequencer and press the Record button. When you’ve finished recording, you can edit the MIDI data in the Piano Roll window. If you need more information about this: We also have an article on how to make Midi Files.
Taking advantage of MIDI mapping in FL Studio
A great feature of FL Studio is MIDI mapping, which allows you to customize your MIDI keyboard to control various functions in the software. To map your MIDI keyboard, simply right-click on the control you wish to assign, select “Map to Controller” and then press the corresponding key or pad on your MIDI keyboard.
Final thoughts on using a MIDI keyboard with FL Studio
In summary, connecting your MIDI keyboard to FL Studio 12 is simple and straightforward. By following the steps above, you can start recording MIDI and take advantage of FL Studio’s powerful MIDI mapping capabilities. So grab your MIDI keyboard and start making music!
| Step | Action |
|---|---|
| 1 | Connect the MIDI keyboard to your computer via USB cable |
| 2 | Turn on the MIDI keyboard and wait for your computer to detect it |
| 3 | Open FL Studio and click “Options” in the toolbar |
| 4 | Click “MIDI Settings” and select your keyboard from the input list |
| 5 | Click “Enable” and “Auto map” to automatically assign parameters to the keyboard |
| 6 | Press a key on your keyboard to test if it’s working |
| 7 | Start playing and recording your music in FL Studio |
Using MIDI Keyboards in FL Studio
If you want to get started using a MIDI keyboard in FL Studio, you’re in luck! The process is relatively straightforward and can open up a world of possibilities for music creation. In this section, we’ll take a deep dive into using a MIDI keyboard in FL Studio, covering everything from choosing instruments to recording and editing your music. For even more info we also have a general article on how to use a midi keyboard.
Choosing Instruments
One of the main benefits of using a MIDI keyboard in FL Studio is the ability to play a wide variety of instruments. To get started, simply press the bar next to the instrument name to turn it green. This will allow you to select and play various instruments, including pianos, synthesizers and drums.
Using a keyboard as a piano
One of the most popular uses of a MIDI keyboard in FL Studio is as a piano. To get started, you’ll want to create a Piano Roll area, where you’ll collect and combine your sound samples. To place a sound sample in the Piano Roll, choose the Packs menu, select a sample and drag it into the Piano Roll area. Here you can mix samples, change their hold, add coloration and effects, and more.
Recording with a MIDI Keyboard
Recording with a MIDI keyboard in FL Studio is simple and straightforward. To start, press the bar next to the instrument you want to record and then press the red button at the top of the interface. In the window that pops up, select the “Automation & Score” option and press the space bar on your PC keyboard. Listen to the four clicks and start playing. When you’re done, press the “Stop” button and your recording will appear in the Piano Roll area.
In conclusion, using a MIDI keyboard in FL Studio is an excellent way to create music and unleash your creativity. By selecting different instruments, creating a Piano Roll and recording with your keyboard, you can create endless music. With a little practice and experimentation, you’ll master the art of using a MIDI keyboard in FL Studio and take your music to the next level.
How to use the FL Studio manual
FL Studio is a powerful digital audio workstation that can be intimidating for first-time users. Fortunately, the FL Studio User Guide is a valuable resource that can help you navigate through the software. In this article, we provide a comprehensive guide to using the FL Studio manual to your advantage.
Understanding the context-sensitive FL Studio manual
The first thing to understand about the FL Studio Guide is that it is contextual. This means that it is sensitive to the plugin or window that is currently in focus. When you press F1 to activate the manual, it will automatically take you to the appropriate page for the plugin or window you are using. This makes it easy to find information about specific features or functions in FL Studio.
The FL Studio manual is a valuable resource that can help you troubleshoot your MIDI keyboard and fine-tune your experience with the software. By following the steps outlined in this article, you can get the most out of the FL Studio manual and improve your music production skills.
Troubleshooting your MIDI keyboard in FL Studio
A common problem users encounter when using a MIDI keyboard in FL Studio is connectivity issues. The keyboard may not be recognized or may not respond to commands. To solve this problem, you can follow a few simple steps. First, make sure your MIDI keyboard is turned on before opening FL Studio. If the device is not detected, try turning it off and on again. If you are using a USB cable without a switch, disconnect and reconnect the cable. Wait for your computer to detect the device before opening FL Studio.
If the MIDI keyboard appears in the input field but does not respond to commands, click the button to re-scan your devices and activate the instrument. If this does not work, try turning off your keyboard, unplugging the USB cable and restarting your computer before connecting the keyboard and restarting FL Studio.
Understanding the Velocity Curve in FL Studio
The Velocity Curve is a feature in FL Studio that applies to MIDI keyboards and pad controllers. It allows you to adjust the relationship between the hardness of your strike, the MIDI input velocity and the velocity value sent to the device. This ensures that you can play the instrument in a way that is comfortable for you. To access the velocity curve in FL Studio, go to the Options menu and select MIDI Settings. From there, you can adjust the velocity curve to your liking.
Now that you’ve connected your midi keyboard to FL Studio, it’s time to include samples. Be sure to read our article on how to add samples to FL Studio.
Conclusion
In conclusion, connecting a MIDI keyboard to FL Studio is a simple process that can be accomplished in a few easy steps. By following the steps outlined in this article, you can ensure that your MIDI keyboard is properly recognized by FL Studio and that you’re ready to create music in no time. With a little practice, you’ll be able to harness the power of your MIDI keyboard to create amazing music that will be the envy of all your friends. So connect your MIDI keyboard to FL Studio and get creative!
Related Posts
- How to Add Plugins to FL Studio: A Complete Guide for Music Producers
- How to Add Presets to FL Studio 12: A Comprehensive Guide for Music Producers
- How to use Autotune in FL Studio: A Comprehensive Guide for Music Producers
- What is a MIDI File? Unraveling the Mystery
- How to Export Stems in FL Studio? A Step-by-Step Guide
FAQ
To make your MIDI keyboard work with FL Studio, connect it to your computer and open FL Studio. Make sure your MIDI keyboard is turned on and that FL Studio detects it by checking the Input/Output settings.
To add a MIDI keyboard to FL Studio, go to the “Options” menu and select “MIDI Settings”. Select your MIDI keyboard from the list and activate it.
If your MIDI keyboard is not recognized by FL Studio, try disconnecting and reconnecting it. You can also check the Input/Output settings and make sure that your MIDI keyboard is turned on before opening FL Studio.
To connect your USB keyboard to FL Studio, simply plug it into your computer and follow the steps above to add a MIDI keyboard to FL Studio.
Most MIDI keyboards will work with FL Studio, but it’s important to check compatibility with your specific version of FL Studio and make sure it’s recognized by the software.